
Orange Cardamom Sourdough Brioche Star Bread

Nothing says holidays more for my family than orange rolls! Growing up in Southern California, the smell of freshly zested and juiced oranges during Christmas time was everything! Making this brings back all the memories.

Orange Cardamom Sourdough Brioche Star Bread Recipe
Makes one 12-inch star loaf
(This is a large batch of brioche dough, you will have enough for this Orange Star loaf as well as a small babka or brioche loaf. This recipe requires a stand mixer with a dough hook attachment)
Both poolish & levain will be made the night before so plan accordingly.
Poolish:
100g all-purpose flour
100g warm water
2g active dry yeast
-Combine ingredients the night before, cover and place in the refrigerator overnight.
Levain:
½ Tbsp. starter
110g. all-purpose flour
110g warm water
-Combine the night before, cover and leave at room temperature overnight.
Sourdough Brioche Dough Ingredients:
500g Bread Flour
13g sea salt
60g granulated sugar
5g active dry yeast
¼ tsp. cinnamon
¼ tsp. ground cardamom
250g large eggs (5-6 eggs)
120g whole milk
150g leaven
200g polish
225g unsalted butter, cut into cubes
-
Orange Filling Ingredients:
175g butter, softened
190g 1 cup granulated sugar
10g Navel orange zest (about the zest of 2 oranges/3 tbsp. of zest)
½ tsp. ground cardamom
¼ tsp. ground cinnamon
-
Icing Ingredients:
185g powdered sugar
50g freshly squeezed orange juice (about 2 oranges/ 3tbsp.)
1 tsp. of orange zest (pinch of zest)
-
Egg Wash:
1 egg yolk
1 tsp. heavy cream
-
Directions:
Remove butter 30 minutes before mixing to bring to room temperature, you don’t want it melted.
1. Combine all brioche dough ingredients, EXCEPT for the 225g of unsalted cubed butter, in a large stand mixer bowl with dough hook attached. Mix for 5 minutes on low speed, scraping down the sides half way through. Once thoroughly combined, allow the dough to rest for 15 minutes in the bowl.
2. After it has rested for 15 minutes, turn stand mixer on medium-high for 6 minutes, or until it has released from the sides of the bowl, this means the dough is ready and developed for the butter to be incorporated.
3. Turn mixer down to medium speed and gradually add in cubed unsalted butter, your butter should be soft and pliable but still cool and not melted. Mix until it is completely combined with no chunks of butter visible.
4. Bulk Ferment the dough at 70F for 2 hours. Keeping it at a cooler temperature ensures that the butter doesn’t melt and separate from the dough. During the 1st hour of bulk fermentation you will be “stretching and folding” your dough 2 times, at 30 minute increments. The last hour, you will “stretch and fold” it 1 time, 30 minutes after the last stretch and fold.
5. During this waiting time, mix up your orange filling. Combine all ingredients and set aside. You can also mix up your orange icing and set aside.
6. Once your bulk ferment is finished, you will divide your dough, this makes a large batch of brioche and yields enough for 2 separate bakes. Save 1/3 of the dough for a small babka/brioche loaf and set aside. The rest of the of the dough will be used for the orange star loaf. With that dough, shape into a circle/ball and divide it into 4 equal pieces, estimating by eye is fine. Roll each section out into 4, 10-inch circles, use all-purpose flour on your rolling surface to prevent sticking, depending on how warm your kitchen is, your dough may be really sticky, if it is too sticky to handle, place it in the fridge to firm up for a bit.
7. After your 4 circles are rolled out, you will begin to build your star loaf onto a piece of parchment paper. Take your orange filling and separate it into 3 equal sections in the bowl that it’s in. Take your first circle, place it on the parchment paper and spread 1 part of your orange filling over your entire circle. Take another circle and repeat 2 more times until you finish with your 4th and last circle, this will be the top of your star loaf.
8. Find a cup/drinking glass as a guide and gently press it into the middle of your circle, leaving an indent in your dough. With a non-serrated, sharp knife, cut your dough into 16 equal pieces without cutting into your indented circle in the middle of your dough. Once cut, visually separate your 16 pieces into 8 pairs, each pair will be twisted 3 times towards each other and then joined at the end pressing the 2 ends together. After they are all paired, tuck in the ends of each twisted pair to create a clean finished edge on each piece.
9. Once you are finished, move your star dough with the parchment paper to a lipped cookie sheet, cover with a light tea towel and let your dough proof for an additional 1.5-2 hours.
10. Preheat oven to 450F and prepare egg wash with an egg yolk and heavy cream. Take a brush and lightly brush egg wash over entire loaf. Move your dough into the oven and make sure it’s on a lipped cookie sheet, butter will melt from your loaf and you do not want it to leak into your oven, believe me this has happened before and it’s a mess! Bake for 30 minutes or until golden brown throughout. Half way through the baking tent the outer circle of your dough using foil to prevent it from burning on the edges. Kinda like you do with a pie crust J
11. Remove when ready and let it sit for 10-15 minutes before drizzling orange icing over the top. Enjoy while warm!


Sourdough Croissant Bread Pudding

This recipe is not for the faint of heart, buttery sourdough croissants, dairy & sugar, you know it’s going to be good! When I make the Tartine sourdough croissant recipe at home, it yields a ton of croissants, so after eating lots of them fresh from the oven, it’s fun to switch it up and make this indulgent bread pudding.

Sourdough Croissant Bread Pudding
• 10 cups sourdough croissants, cut into 1” pieces
• 2 cups milk
• 2 cups heavy cream
• 1 cup sugar
• 1 cup brown sugar
• 3 eggs
• 3 tsp. vanilla extract
• 1 tsp. ground cinnamon
Instructions:
1. Spray a 9”x13” baking dish with cooking spray
2. Place cubed sourdough croissant pieces in the baking dish
3. In a medium mixing bowl, combine milk, heavy cream, sugar, brown sugar, eggs, vanilla extract and ground cinnamon. Whisk until smooth and combined. Pour over the cubed croissants.
4. Cover with foil and refrigerate for 1 hour and preheat oven to 350ºF.
5. Bake uncovered for 35-40 minutes, or until golden on top and cooked thoroughly.
Option for Brown Sugar Buttermilk Syrup:
• ½ cup butter
• ¾ cup brown sugar
• ½ cup buttermilk
• 1 tsp. baking soda
• 1 tsp. vanilla extract
1. In a medium sauce pan over medium heat, combine butter, brown sugar, and buttermilk. Bring to a boil and cook, stirring constantly for 2 minutes or until the sugar is completely dissolved.
2. Remove from heat and add baking soda and vanilla extract and serve over bread pudding.


Fougasse Sourdough Recipe

“A type of lattice-shaped bread associated with the area of Provence, France.”
SOURDOUGH FOUGASSE
Makes 3 large fougasses
The first time I saw these I saw them on @blondieandrye and I thought they were beautiful!
These should be the new breadsticks!
I adapted this recipe from @mydailysourdoughbread
• INGREDIENTS •
Levain Ingredients:
100g warm water
100g bread flour
1 heaping tablespoon of active mature sourdough starter
Fougasse Ingredients:
200g sourdough levain that was prepared the night before
330g warm water
450g bread flour
50g whole wheat flour
10g sea salt
Any preferred topping: cheese, herbs, salt etc.
10-20 ice cubes for baking
DIRECTIONS:
The evening before, prepare your levain for the fougasse. Measure 100g of warm water, 100g bread flour and 1 large tablespoon of your active mature sourdough starter. Combine until there are no lumps, cover and place in a draft-free warm area overnight for 12-14 hours.
In the morning your sourdough levain should have doubled in size and be full of bubbles. Mix your levain into the 330g of warm water. Add the 500g of measured flour and mix by hand until fully incorporated and no dry ingredients can be seen. Leave the dough to rest (autolyze) for 30 minutes. By doing this the dough will be easier to handle because the flour would absorb the water and gluten strands will start to form. After the autolyze, you will notice the dough has relaxed.
After the autolyse, add the 10g of salt and mix by hand for 4 minutes until incorporated.
You will begin your bulk fermentation and let it sit for 2 hours covered, during this time you will perform 4 series of coil folds or stretch and folds every 30 minutes. After these 2 hours, let it rise for an addition 2-3 hours or until your dough is well-developed, strong and bubbly.
Flour your counter and turn your dough out and divide into 3 pieces, round out each pieces into a ball, cover and let it rest for 40 minutes. Meanwhile, prepare a piece of parchment paper and lightly flour it. After your dough has rested, lightly roll it out into an oval or rectangle shape and use a pizza cutter to create holes. You can do a ladder, leaf or whatever you design you please! Carefully stretch the dough again to end up with more open holes. Lightly dust the surface of your shaped fougasse and cover them to let them rest one more time for 40-50 minutes for its final proofing. During this time preheat your oven to 500F and place your baking stone in the middle of the oven and your baking pan at the bottom of the oven., this will be your pan to place your ice cubes/water in to steam during baking.
If you don’t have a baking stone, you can flip over a baking sheet and use that to bake on. I also, cut the parchment paper around each formed fougasse so that I could fit more than one on my sheet to bake. At this point you can top your fougasse with your preferred topping: salt, cheese, herbs etc.
When ready to bake, transfer the fougasse with parchment paper onto the baking stone, immediately throw 10 ice cubes or a cup of water into the baking pan, close the oven door and turn down the temperature to 450F. Using the ice cubes will create steam and create a crust to form. Bake for 20-25 minutes or until golden brown.

Bagel Sourdough Recipe

“You are the cream cheese to my bagel.”

SOURDOUGH BAGELS
makes 12-18 bagels
Ingredients:
2 cups starter
1 1/4 cups warm filtered water
1 Tbsp. oil
5 1/2 - 6 cups bread flour (if you want you can do 1/2 whole wheat/half bread flour)
1 Tbsp. salt
•
Any add-ins or toppings
1 egg for glazing the tops and to help the toppings stick
1 Tbsp. baking soda for the boiling water
Topping & add- in options:
-Everything seasoning, I purchased mine at Trader Joes
-Cinnamon sugar with brown sugar
-Cheese and jalapeños
- blueberries
-chocolate chips
Directions:
1. Mix 2 cups of starter, 1 1/4 cups warm water, 1 tbsp. oil, 5 1/2 cups bread flour, & 1 Tbsp. salt. You can make a levain the night for more depth of flavor.
2. Knead dough: by hand- 10 minutes or with dough hook- 4 minutes. Bagel dough should be firm
3. Transfer to a greased bowl & let it rise for 4 hours, doing 3 sets of stretch & folds in the first 2 hours.
4. Transfer dough onto a lightly floured surface and flatten out and cut dough into 12-18 pieces about 5oz. each.
5. Shape each piece into a ball and stick your finger in the center creating a bagel shape. Make the hole in the center bigger than you think because the bagels will proof and it can close up. Place on parchment paper and cover with suran wrap, I didn't want my suran wrap to stick to the bagels so I used cups to stick in between a few of the bagel and placed the suran wrap over that so it rested on the edge of the cups. Let it sit for 1 hour in warm environment.
6. Preheat oven to 450ºF. Prepare a pot of boiling water and add 1 Tbsp. of baking soda. Add in a couple bagels at a time, let it boil 30 seconds for each side, 1 minute total for each bagel. Remove bagel with a slotted spoon and place on parchment paper. Prepare an egg wash for the bagels, whisk one egg with a pinch of salt and after bagels are mostly dry on the top, glaze each top with your egg wash and your topping of choice.
7. Bake your bagels for 14-15 minutes, keeping an eye on them and rotating pan if needed to get an even bake. Remove and place on cooling rack.
Challah Sourdough Recipe

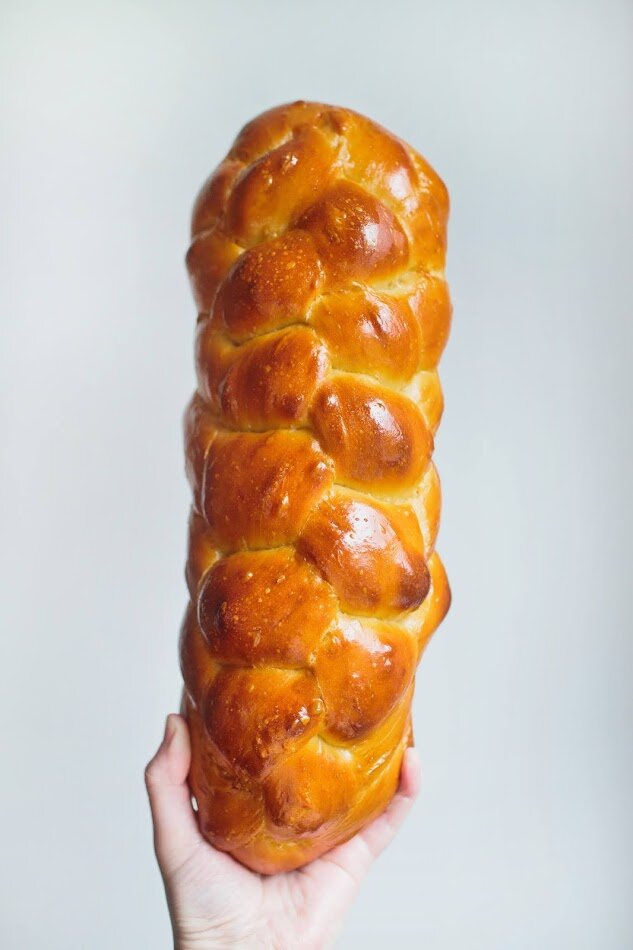
SOURDOUGH CHALLAH RECIPE
makes 1 large loaf | time: 20 hrs (about 8.5 hrs on baking day)
Levain: (made the night before, for at least 12 hrs.)
35g ripe starter
80g warm filtered water
135g bread flour
Final Dough:
fully fermented levain- shown above
60g warm water
3 lrg. eggs (plus 1 for glaze)
8g sea salt
55g vegetable oil
65g honey or sugar (I used sugar)
400g bread flour
Directions:
DAY 1:
1. Levain: The night before, mix together your challah levain. Mix 35g of ripe starter, 80g warm filtered water, and 135g bread flour. Combine until the flour is completely combined with wet ingredients, cover and set in a warm area overnight. I like to use my oven with the light on, make sure it is not hot from previous baking.
DAY 2:
2. Mixing: In a large bowl, beat together the 60g warm water, 3 eggs, 8g salt, 55g vegetable oil, 65g of honey/sugar until it is well combined. Starting with a wooden spoon, mix in all of the 400g bread flour, I like to finish mixing with my hand, I run my hand under water and hand mix everything at this point. When the mixture is a shaggy ball, mix in the levain and knead the dough until it is smooth, but no more than 10 minutes of mixing. This dough is very firm and should almost feel like modeling clay. If it's too firm add in 1-2 tbsp. of water or too wet add in 1-2 tbsp of flour. The dough should feel smooth and very firm but be easy to knead.
3. Fermenting:
Place the dough in a bowl and cover. Let the dough ferment for 2 hours. It will probably not rise much at all, this is where the flavor begins to start!
4. Shaping and Proofing:
Line a large baking sheet with parchment and set aside. Transfer dough onto a clean, lightly floured surface and you will begin to divide your dough into equal parts. At this point decide how many strands you'd like to braid for your dough. Mine shown above is a 6 strand braid. An easy way to cut it into equal parts is to first cut it in half, then cut the halves in half...etc etc. and you can even use your scale if precision is your thing. :)
Here's a video to show you how to do a 6 strand:
https://www.youtube.com/watch?v=BWSPfToKiYA
A good tip is to use little pieces of paper and pin them on the end of each strand numbering each 1-6, that way you can keep track of which strand is which. I also think it's important to pinch the ends and tuck them under, if not they can burn while baking and bake unevenly.
After it is shaped as desired, position them on the prepared sheets and cover them well with the plastic wrap. I didn't want my plastic wrap to stick to the proofing dough so I used a bigger piece and placed upside down cups on the sides of the dough for the plastic wrap to rest on. Let this proof for 5 hours, until it has tripled in size.
5. Baking:
Preheat the oven to 350ºF, at the end of the proofing and prepare egg wash glaze. Beat 1 egg with a pinch of salt for glazing the breads.
When the loaf has tripled in size, brush it with the egg glaze, make sure to get into all the crevices. If you are baking a large loaf like I did, bake for 35-45 minutes, 20 minutes into the baking rotate the pan to get an even bake. If it is browning too much, tent it with foil. When the loaf is done remove from the oven, let it cool, take a picture and tag @sour__flour :) & lastly but most importantly ENJOY!!
I loved this bread for french toast the next day. I used the entire loaf for french toast and froze the slices we didn't eat, that way when the kids want a yummy breakfast I can easily put one in the toaster for them!
The 6 strand braid is a repetition. Always have 2 outside strands and after crossing one over, bring the other side down in the middle. Then replace the empty side with the 2nd to the outside strand, and then bring the opposite down in the middle. This feels ridiculous trying to write it out in words, so watch a video and then this drawing should help you to remember .

If you really can’t wrap your head around it, take pieces of paper and either color them like shown above or write the color and attach it to each strand and just follow the color shown for each one.


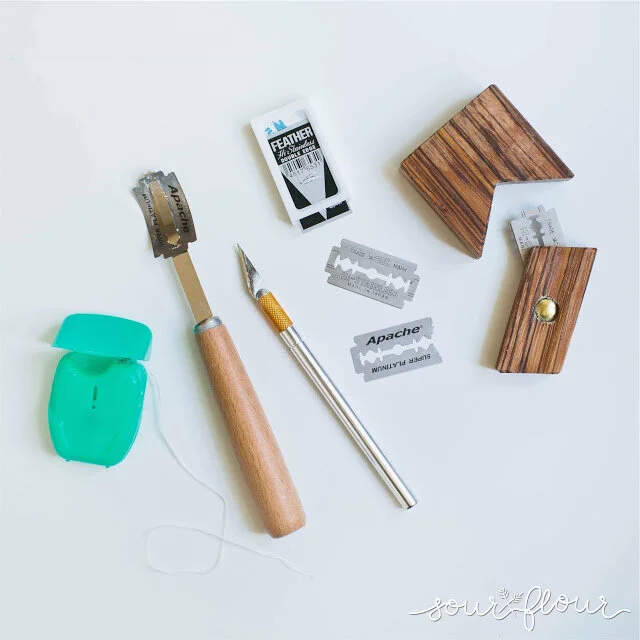
Tools for Scoring Sourdough
“An painter doesn’t use one paintbrush,
so why should a baker only use one tool to score their bread?”
Today I’m sharing all of the different scoring tools I use and how/when I decide to use each tool.
I have loved experimenting with all of the different tools, and now as I am scoring, and have a design in mind, I know which tool to use and for what kind of affect I want on the final bake.
Bread lame: I use this to create my main score across the bread to achieve an “ear” on my loaf. The arch on the blade, cuts the dough while lifting it up to some extent, allowing it to rise and flap up creating the ear that everyone aims for.

X-acto knife: This was my first tool of choice, if you can only have one tool I’d choose this. X-acto knives are good for straight, deep cuts, and if you want a big separation in your bake as well.
-I specifically like using this for my Aztec designs. My “sunbeam” design was scored with just this and allows you to get straight lines because you have a sharp point on the end that cuts deep into the dough.
-You can also use the blade upside down to “sketch” out your design without piercing the skin of the dough.
-And If you don’t own a classic bread lame, you can score the dough directly at first with this knife just by holding it vertically and slicing into the bread, then afterwards, hold it at an angle and using the blade to cut horizontally separating the cut to create a “flap” on your dough to then create an “ear” on your loaf in the final bake.

Razor Blade: I use this for shallow/detailed cuts. In my videos you can either see me holding the razor blade itself, or I have started using Bread Llamas scoring tool. I’ve also seen Wire Monkey’s tool which is similar. By using a razor blade like this, you can get intricate, thin cuts that when baking, open up to be small, detailed cuts. When I want the small leaf cuts or the infamous “wheat” design, I use this. It allows you to not cut super deep and when it bakes, the cuts bake up to be intricate, perfect leaf designs (if that’s what you’re choosing to do with it). And because the blade is so thin, it allows you to bend the blade easily for curved designs as well.

Scissors: I use scissors at the very end of my scoring if I want my corners to flap open or I cut it deep to potentially have it poke out and lift up while it bakes. This makes sure some of the dough is separated to ensure lifting up when it bakes.
I have loved experimenting with all of the different tools, and now as I am scoring, and have a design in mind, I know which tool to use and for what kind of affect I want on the final bake. Here's a few examples showing which tool I used for each design.


Master Sourdough Recipe

All you’ve wanted is right here in this post. Here’s my sourdough recipe I use for all of my bread posts, adapted from Tartine Bread & Fullproof Bakery. This recipe makes 2 loaves around 615g each. This is a 3 day process, so patience is your first & most important ingredient! If you need to, you can push it into 2 days, and build your levain early in the morning when you make your autolyse.
1st Night: Build Levain
2nd Day: Mix autolyse, combine levain & autolyse, salt, ferment & cold-proof overnight
3rd Day: Score & bake your bread! & Then Eat! …My favorite part.
SOURDOUGH RECIPE
makes 2 - 615g loaves
Sourdough Ingredients:
• 140g Whole Wheat Flour
• 510g Bread Flour
• 505g Filtered Water
• 150g Levain*
• 19g Sea Salt or Kosher Salt - (If you are using same-day freshly milled wheat, use 21g salt)
*Levain Ingredients:
• 30g Ripe Starter/Culture
• 60g Warm Filtered Water
• 60g Bread Flour
Directions:
DAY 1 :
The night before, assemble your levain by combining: 30g of ripe starter (ripe meaning that you didn’t just feed it, that it has been sitting at least 5-6 hrs. beforehand), 60g of warm filtered water, and 60g of bread flour. Mix in a bowl until flour is combined completely, cover loosely, and place in a warm, draft-free area. I like to use my oven, and if it’s cold, I leave my oven light on.
DAY 2 :
When you wake up you will first assemble the autolyse. Autolyse is a technique and simply combining both flours & water and letting it sit at room temperature for 2-4 hours. Autolyse gives you a dough that is easier to work with and also improves it’s texture, rise & flavor. Combine 140g whole wheat flour, 510g bread flour, & 505g filtered water. I first mix it with a spoon and at the end wet my hand and finish combining with my hand. Combine it thoroughly until there are no more dry ingredients seen. Cover and let it sit for a minimum for 2 hours, preferably 4 hours.
After waiting the appropriate time for your autolyse, add in your bubbly levain. From this point on you will be hand mixing, and to make it easier I like to get my hand wet and just run it under your faucet real quick. Hand mix your dough for 5 minutes until completely combined. After this add in your 18g of salt and hand mix for 4 minutes. Hand mix it until the salt is dissolved, you do not want to feel any grains of salt. As you’re mixing, stretch the dough up and down to start the gluten building. Once everything is combined, cover for 30 minutes and place in a warm, draft-free area, again, I use my oven with the light on as a proofing place for my dough.
Fold: After 30 minutes of sitting, you will fold your dough. Mist a clean countertop with water and place your dough onto the damp counter. Visualize your dough as a square, take each side pulling up away from the counter pulling it up towards the ceiling as high as you can, folding it back into the middle of the dough. You want to get as much stretch up towards the ceiling as you can, this is building strength in your dough. Continue to do this for the remaining 3 sides. After folding all 4 sides, gently flip over your dough to the smooth side, place it back into your bowl, cover and place in a warm area and let it sit for additional 30 minutes.
Lamination: Mist your hands and a clean countertop with water. Gently transfer dough to your countertop, you will be stretching your dough out into a big rectangle until it is very thin. With a stretching/pulling motion, slide your metal scraper under your dough and place one hand on top of the dough and stretch as far as you can without ripping the dough to be about 1/2- 3/4” thick. At this point, you can add in any extra flavor/mix-ins you’d like ie: seeds, dried fruits, chocolate etc. Fold your dough lengthwise into thirds then roll up tightly. Flip dough having the smooth side up and place back into your bowl. Cover and place in a warm area for 45 minutes.
• As a rule, a warmer environment will proof your dough faster. You don’t want to rush bulk fermentation because that’s what produces the good depth of flavor. 76ºF-78ºF is a perfect temperature to aim for, so if you live in a hot humid environment, find somewhere cool in your house for it to ferment in or if you live somewhere cold, get a proofing box or you can put it in your turned off oven with the light on.
Bulk Fermentation: So onto the most important part, this is where you will be building gluten strength, which gives you the height and oven spring everyone aims for. Also what you do during this process will determine the crumb. So after the lamination phase and 45 minutes of waiting, you will do your first stretch & fold known as S&F #1. There are many ways of doing this but I like to do the coil fold technique, it’s easier for me to get a good stretch and it keeps the dough looking pretty on top. During this next process, gently pop any visible bubbles.
S&F #1: Coil Fold - Get your hands slightly damp, and take both hands and slide them under each side, gently pulling up towards the ceiling and coil one side under itself. The main point of this is to build strength in your dough and to get a good high stretch. Rotate the bowl 180º and coil fold the other side. Rotate 90º and repeat the same process for the other 2 sides. Cover and place in a warm area for 45 min. to 1 hour. You will determine how long depending if you live in a cooler or warmer climate.
S&F #2: After waiting the appropriate time after your 1st S&F, repeat the coil fold on each side, you should start to feel it get stronger. Gently pop any visible bubbles. Cover and set in a warm area and wait another 45 min. - 1hr.
S&F #3: After waiting the appropriate time after your 2nd S&F, repeat the coil fold on each side. Gently pop any visible bubbles. Cover and set in a warm area and at this point you will let it continue to proof untouched for 2-3 hours. During this time it should double in size. You will know it is appropriately proofed if you gently press your finger into the dough and it slowly springs back. It is harder to tell though because it is a very high-hydrated dough. You will learn as you continue to bake and learn more about your dough. Be careful not to overproof your dough, if your kitchen is really hot it will proof too quickly, de-gass your dough and bake flat. Also another proofing tip is if you slant your bowl over on the counter, your dough should release on its own, it shouldn’t be overly sticky to the bowl.
Shape: Lightly dust your clean countertop with all purpose flour. Gently transfer your dough onto the floured surface. Using your scraper cut the dough in half, place one aside to wait while you shape one loaf. Shaping is best to watch a tutorial on but I’ll try to describe it on here.
Shaping a Batard (Oval Shaped Loaf) : Move your dough to be square shape, starting on the left side, gently pull out and up, shaking it and quickly place it back in the middle of your dough. Repeat this on the opposite side. Then take it from the bottom and repeat and then from the top. Now starting at the seam you will begin to stitch and fold. Place your hands on each side starting at the top, you will pick up each side ad cross it over to the other side as if you’re creating a zig zag with the dough. As you place down the dough make sure it stays sealed. When you reach the bottom you will roll like a coil, then you can seal and pinch the two ends. Then take your scraper on each side and make sure the bottom of your dough is sealed. During this time you can prepare your proofing basket, banneton*, or bowl. If you are using a tea towel to line your basket or bowl, lay it on top of your bowl, dust with flour. Use your scraper to lift the dough gently from the counter and in a quick action, flip it over to your floured towel, the bottom of the loaf should be faced up. Cover it with the remaining towel, pull the towel tightly to support your dough and cover. Let it sit at room temperature for 20 minutes while you shape your other loaf. Then place in your refrigerator for 12-18 hours overnight. This is called cold proofing, the flavor will be enhanced during this time, but it will not over-proof because it’s in the cold. Also, if your fridge freezes in the back, make sure you don’t set it in the very back, I like to set mine on the top shelf in the middle, so that it’s a constant, consistent temperature.
If you are using your banneton with no lining, you can prep it the day before with a mist of water and liberally covering it with rice flour, dump out the remaining flour and that should help prep it so that it doesn’t stick. Before transferring your dough into the banneton, still dust it with your choice of flour, I use all-purpose. Then cover it with suran wrap or a reusable option is a clean shower cap from the dollar store. Place in your refrigerator for 12-18 hrs overnight.
DAY 3:
Scoring & Baking:
Before taking your proofed dough out of the refrigerator, preheat your oven to 500ºF.
Scoring: This is the funnest part in my opinion. Prepare your parchment paper, I like to create handles on the side so I don’t burn my hand… that has happened way too many times. I have videos on my instagram of this. For the best oven spring, you want to score your dough directly out of the refrigerator and get it in the oven as soon as possible. By taking it out of the cold and putting it right in the hot oven it makes it rise up that much more. Dust the top of your dough with all-purpose flour, score your bread, open your oven, place bread in dutch oven with the lid on and close the oven.
Baking: Everyone’s oven is different, so here’s time and temperatures to go by, but keep an eye on your bread. Once you bake a couple times you’ll know what’s best for you.
For a regular oven:
500ºF for 15-20 minutes, covered with the lid on
450ºF for 15 minutes, covered with the lid on
450ºF for 8-10 minutes, uncovered
For convection oven: (this is what I use)
500ºF for 18 minutes, covered with the lid on
450ºF for 12-15 minutes, covered with the lid on
450ºF for 5-6 minutes, uncovered
Let bread rest & cool & then enjoy & eat!!